1. Parker instrument tube fittings are sold completely assembled and ready for immediate use. Simply insert the tube as illustrated until it bottoms in the fitting body. (If the fitting is disassembled, note that the small tapered end of the ferrule(s) go into the fitting body.)
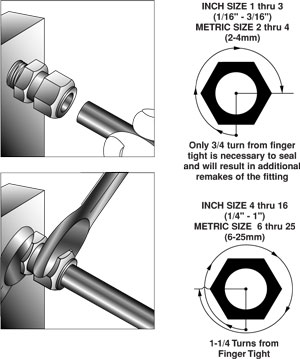
2. Tighten nut finger tight. Then tighten nut with wrench an additional 3/4 or 1-1/4 turns indicated at left. Hold Parker fitting body with a second wrench to prevent body from turning. It is helpful to mark the nut to facilitate counting the number of turns.
For maximum number of remakes, mark the Parker fitting and nut before disassembly. Before retightening, make sure the assembly has been inserted into the fitting until the ferrule seats in the fitting. Retighten the nut by hand. Rotate the nut with a wrench to the original position as indicated by the previous marks lining up. (A noticeable increase in mechanical resistance will be felt indicating the ferrule is being re-sprung into sealing position.)
Only after several remakes will it become necessary to advance the nut slightly past the original position. This advance (indicated by B) need only be 10° - 20° (less than 1/3 of a hex flat).

Parker A-Lok/CPI® Tube Fitting part numbers use symbols to identify the size, style, and material. Tube and pipe thread sizes begin with a number indicating their size in sixteenths of an inch. For example, 4=4/16” or 1/4”; 16=16/16” or 1".
NOTE: Lubrication on the nut is REQUIRED for proper assemblyon all LARGER size fittings in both inch and metric sizes. This requirement applies to:
- inch sizes of 20 and higher
- metric sizes of 25 and higher
Gaugeability Instructions*

1. From “finger tight” position, wrench 1-1/4 turns for 1/4" to 1" size fittings (6mm to 25mm) (1/16", 1/8", 3/16", 2mm, 3mm and 4mm size tube fittings only wrench 3/4 turn from finger tight position). Hold fitting body hex with second wrench to prevent body from turning as you tighten. It is a good idea to mark the nut (scribe or ink) to help you count the turns.

*For initial make up only.
If you would like more information about Parker A-lok/ CPI Instrumentation Tube Fittings or other Parker Products please contact Forberg Scientific Inc Customer Service.
Toll Free: 855-288-5330
Email: mechanicalsales@forberg.com
This blog is really a great source of information for me.Thank you for sharing such a useful content.Feel free to visit my web page Camlock coupling
ReplyDelete